
Customer Check-In

plant key:
| genovese basil | parsley | sweet basil | stevia | stevia | lettuce |
| genovese basil | thyme | sweet basil | stevia | stevia | kale |
Still haven’t planted the lettuce or kale. The cubes are getting a small amount of algae as the nutrient mix I put on them gets exposed to the stronger light. This is not uncommon. I’m ignoring the algae for now because at this level it does not (caveat: I’m no expert) choke off the plants from getting their food (AKA nutrients – I like thinking of the plants as getting a wonderful meal carefully crafted….).
Thanks to Those That Went Before
Home Depot – For having an employee like Ken. Ken deserves a moment of respect and grateful appreciation from customers (like me) who he has helped. When I go to Home Depot’s electronics aisle, I am relieved when I see Ken (he isn’t there every time I go). Ken has MEGA years electronics experience and is the type of person who listens to what I am trying to do then suggest Home Depot products that best meet the need at the lowest price. Ken has an awesome background story about why he is working at Home Depot. Ken smiles and is always kind. Take THAT machine learning replacements that don’t need to concern themselves with providing a home for their families (ah, but I diverge…although from talking to other home depot employees, unfortunately they cannot afford housing in our neighborhood even with a $15 minimum wage…is there an app for that? An app that gets these folks a life where “…the pursuit of happiness” is integrated into their pay so they can afford housing?). THANK YOU KEN. I did the minimal I can do – I sent a comment from the Home Depot web site letting them know I shop at Home Depot instead of Lowes because of you.
Here is the email I got back from Home Depot:
—————————————————————–
Thank you for contacting The Home Depot and sharing your wonderful experience with Ken!
Outstanding Customer Service is a cornerstone of The Home Depot and we are so excited to hear first-hand how much this means to our customers.
I have created Customer Care Case #05359597 with all the information that you have provided. This will be shared with the store leadership so that they may share in our celebration of this great news!
Thank you for taking the time out of your busy day to reach out to us, and thank you for being a customer of The Home Depot!
Sincerely,
Team Customer Care
The Home Depot Email Response Team
—————————————————————–
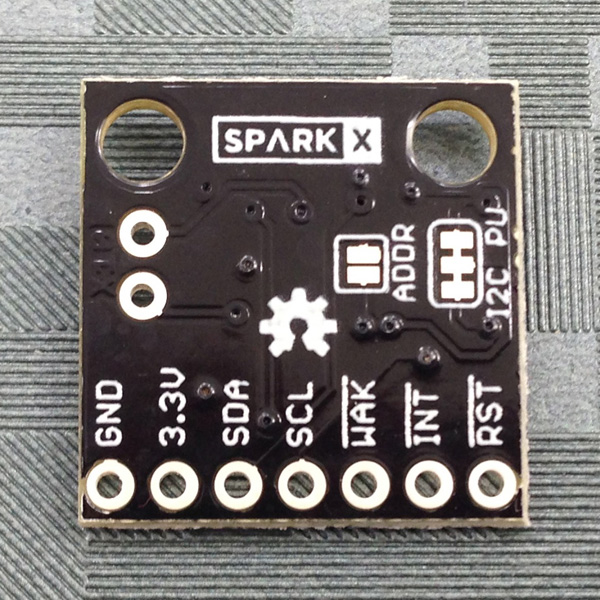
SparkX – for publishing the schematic and layout of their CCS811 breakout board (GitHub location). It is not just a copy and paste exercise for me. I learned from the techniques used both in building the schematic as well as the layout.
Levitron – for providing a video on installing the wires of a wall socket (receptacle). The video can be found on this Home Depot page. The tip about inserting the cane of the wire clockwise into the screw makes a lot of sense…but I didn’t think to do this before watching the video.
The Relay Box
 DOH – I didn’t understand how to wire the AC side of the Relay Box – specifically, I (and this is dumb, I know) thought each wall socket would connect to a different relay. Meaning I could use a 2-gang setup as I noted in this post. Um…no…each wall socket goes to one relay. Um..yah…duh…so I redid the wiring and replaced the 2-gang box with a 3-gang box and face plate:

(Update 2/28/2017)
 When I went to the the circuit design above, I first tried to remove the metal tabs but was unable to.As I bumbled around, I found this Electrical 101 post on split receptacles.

OOh – Now I know what I have been calling a wall socket is most referred to as a receptacle in the world of the electrician. Knowing this really helped Google searches on this stuff :-).
 I’ll try this split (duplex) receptacle from Home Depot the next time I build a multi receptacle relay box.
The color coding refers to the Arduino wire colors.
 YIPPEE! The good news is all tests – water pump, CO2 adjustment, LED lights on/off – worked. I tested theLeafSpa Arduino code for turning the water pump and LED on/off. I wanted to better understand the settings for adjusting the CO2. So I ran a separate CO2 adjustment test. One thing I learned was my current design for the Grow Chamber cover leaks more CO2 than it probably should. It is not a lot, but will mean more CO2 will be released than needed. My next step will be to duck tape down the cover. However, I want to see about putting the panels back on the Base before I do that.
Wire Gauge
HMMMM… One (of the many things 🙂 ) thing I lacked knowledge of was outlet wiring. Wiring AC demands a higher respect than wiring up a prototype using an Arduino. Taking a step back, these are my AC relay wiring notes to myself:
- use the rule of thumb I received from hansmoman when I posted a question about wiring to the /r/AskElectronics subreddit:

- But then – when I look at LED wiring, the AWG gauge is the smaller 18 AWG gauge. So I will end up using this rule of thumb:
But how much current does each of these (LED lights, water pump, CO2 regulator) draw?
How Much Current?
I’m going to explore using my trusty Kill A WATT meter.
Measuring the current using the Kill A Watt meter,

I created this spreadsheet (google docs link – go to the Amps needed sheet):
| Power Sink | Amps | Appliance |
| water pump | 0.1 | Active Aqua Submersible Water Pump, 160 GPH |
| CO2 solenoid | 0.04 | ProLabs CO2 Regulator w/ Solenoid Valve |
| LEDs | 0.85 | The Leaf Spa BoM |
Let’s say they are all on at the same time. The total current = 0.1 + 0.04 +0.85 = .99A. 1A. Clearly, these appliances don’t draw what an appliance in a house – like a toaster, microwave, or tea kettle – might gobble up. Looking up the amount of current load the different gauged wires can handle, for future builds I will use an 18 AWG wire like this one.
Sensor Puck Layout
Moving over to the Sensor puck…
As I was doing the layout, I really liked the jumper done for determining which I2C address in SparkX’s layout (GitHub location) to use:
Here is the layout as I currently have it:

The outline is 1” x 1”.
The next step is to print out the front layer layout. I do this through the print (not plot) option:

which creates this:

The next step is to print out this page and map the actual parts to the pads. This will check whether the footprints I am using (particularly for the CCS811 and Si7006) are correct.
And that is it for today.
